TOP TIPS FOR EXTENDING YOUR ROAD BIKE’S LIFESPAN
Simple tips to keep your bike maintained and safe
Just as many non-cyclists go on about how much they enjoy their “new car smell,” for cyclists, nothing beats the feeling of “new bike day.” That’s when every component is brand new and fresh to the feel. The drivetrain sings a synchronized mechanical symphony of precision, the brakes feel like you have unlimited power at your fingertips, and the frame has yet to show signs of even a scratch or spec of dirt.
Unfortunately, for every mile ridden, your bike’s performance will begin to degrade from your very first pedal stroke. The fact is, anybody who claims their bike is “brand new” is only truthful if they’re putting it together as you’re having the conversation. In fact, for some of these components, the “wear clock” actually starts when you first tighten them in assembly.
Cycling is a mechanical sport, and the parts we rely on for fitness and adventure are designed to wear. While there are many tips and tricks you can use to extend the life of your bike and its critical components, it’s equally important to know how to spot a part that just needs to be retired. We’ll show you how to get the most from your hard-earned parts first, and when it’s better to retire and replace instead.
TIRES
There’s no good rule for how long your tires should last. Some riders may get a couple of years out of their rubber, while others may burn through multiple sets of tires in a summer of racing. Where and how much you ride determines this entirely, but learning to read the wear pattern on your tires will ensure that you’re not only getting the most mileage but also the best performance out of them.
Average tire life seems to range from a few hundred miles for the softest of race tires to a couple thousand with an endurance tire in ideal conditions. Tires will begin to show wear and go through a few different phases as they age.
As a tire wears, the rear is normally the first to show signs. On a road tire, the rear will begin to form a flat center groove. On gravel tires, the little rubber nipples will fall off. As the virgin surface burns off, the tires should come to full grip as they break in. Road tires will lose the sheen, while gravel tires with knobs will be sharp and fresh, and the handling of the bike will be at its absolute best.
After a few hundred miles, a tire will begin to show signs of wear, maybe a few small cuts in the rubber and the sidewalls may even seem to expose the texture of the tire’s casing under the thin layer of rubber. On a road tire, if you have already started to create a flat spot in the rear, or on a gravel tire your cornering knobs still look like they haven’t touched the dirt, you may want to decrease pressure to allow the tire carcass to better conform to the ground. Conversely, if your sidewalls have a distinct wear line where, due to squatting from losing pressure, regardless of the amount of rubber left, your tire may be under-inflated. Either way, it’s a good reason to try a different setup or pressure.
Depending on the tire style, loss of grip and traction can become notice-able with as few as 500 miles all the way up to 1000 miles. While tires can be pushed past this wear level, many riders opt to simply replace at this point. Also, remember that rubber is the best opposition to punctures, so old tires will be more vulnerable to punctures. Moreover, if you’ve plugged a tire to repair a puncture (if using tubeless) or have had multiple flats on the same tire, consider a new tire or different setup; it’s not worth the increased risk of failure on a future ride.
Only our absolute favorite tires, ones which have survived our marginal line choices and somehow avoided damage from L.A. potholes and gutter debris to still hold air reliably, are pushed past what we would call the 50-percent wear mark. Beyond this, stretching the life of a tire becomes a balance between thriftiness and performance, and ultimately a gamble on safety and reliability. We’ve been on the losing end of this with both flat tires that left us far from home, and crashes that came unexpectedly from a loss of grip. Since tires are the lifeline between staying upright and braking, rather than using the skin from your hip bone, we’d recommend replacing worn tires before they’re down to the threads.
WHEELS
Since the invention of the disc brake, wheels stopped wearing in the traditional sense of the word (as in the brake wall), but they can and still do fatigue. Aluminum rims can be bent back and trued, but one that constantly comes out of alignment or requires uneven spoke tension to straighten are signs that it should be replaced. Always check for cracks at the spoke holes and rim joint. Carbon rims do not bend or fatigue like aluminum but do break or crack.
Spokes and nipples will also fatigue over time and need to be replaced. A single broken spoke is not typically a cause for concern, but if more than one breaks, it is. If you notice a nick in the rim or a damaged spoke, the failure was likely damage/debris related and not fatigue. We like to follow the rule of three—more than three broken spokes, it’s time to have the wheel replaced or rebuilt with fresh spokes and nipples. This is also a good time to upgrade if you might need it. Consider switching to a modern, wide-internal-dimension rims, 19mm–30mm to help boost air volume, and accommodate 25-50mm tires. Also, consider hubs with more engagement, especially if riding gravel or racing road. Consider both when the time comes—don’t just do a lateral replacement.
BRAKES
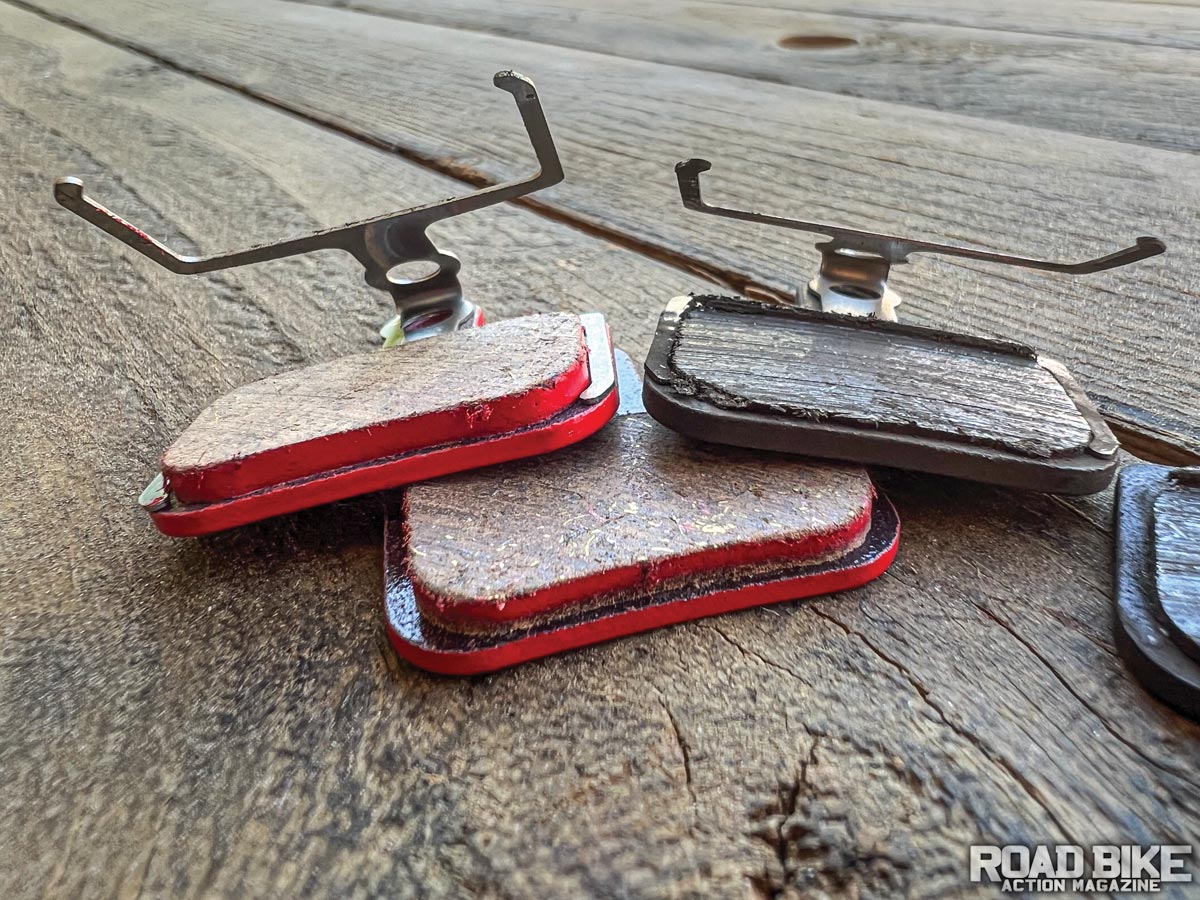
Brake systems wear down both from friction wearing down pads and rotors, and from heat that’s created, which degrades the fluids and seal performance over time. Riders who don’t do as much aggressive descending will get more life from their brakes, while larger riders and those who love to rally the descents will have more maintenance to deal with. Your first set of pads will likely last about as long as the stock set of tires in our experience, but riding in the wet and grime can kill a set of pads in a very short amount of time.
It’s best to check the thickness of your pads at least every few rides. The pad material should be at least a few millimeters thick on top of the backing plate, and if you’ve worn past there, it’s definitely time to replace. The return spring thickness is what we use to identify when to change disc pads. When it comes to rotors, most of them start at about 1.8–2mm thick, and the companies will etch the thickness at which you should replace on the rotor itself. Look carefully at the lettering stamped in the metal and it should give you this info, which is usually 1.5 or 1.8mm thick. Most rotors will last four to six sets of brake pads before they need replacement.
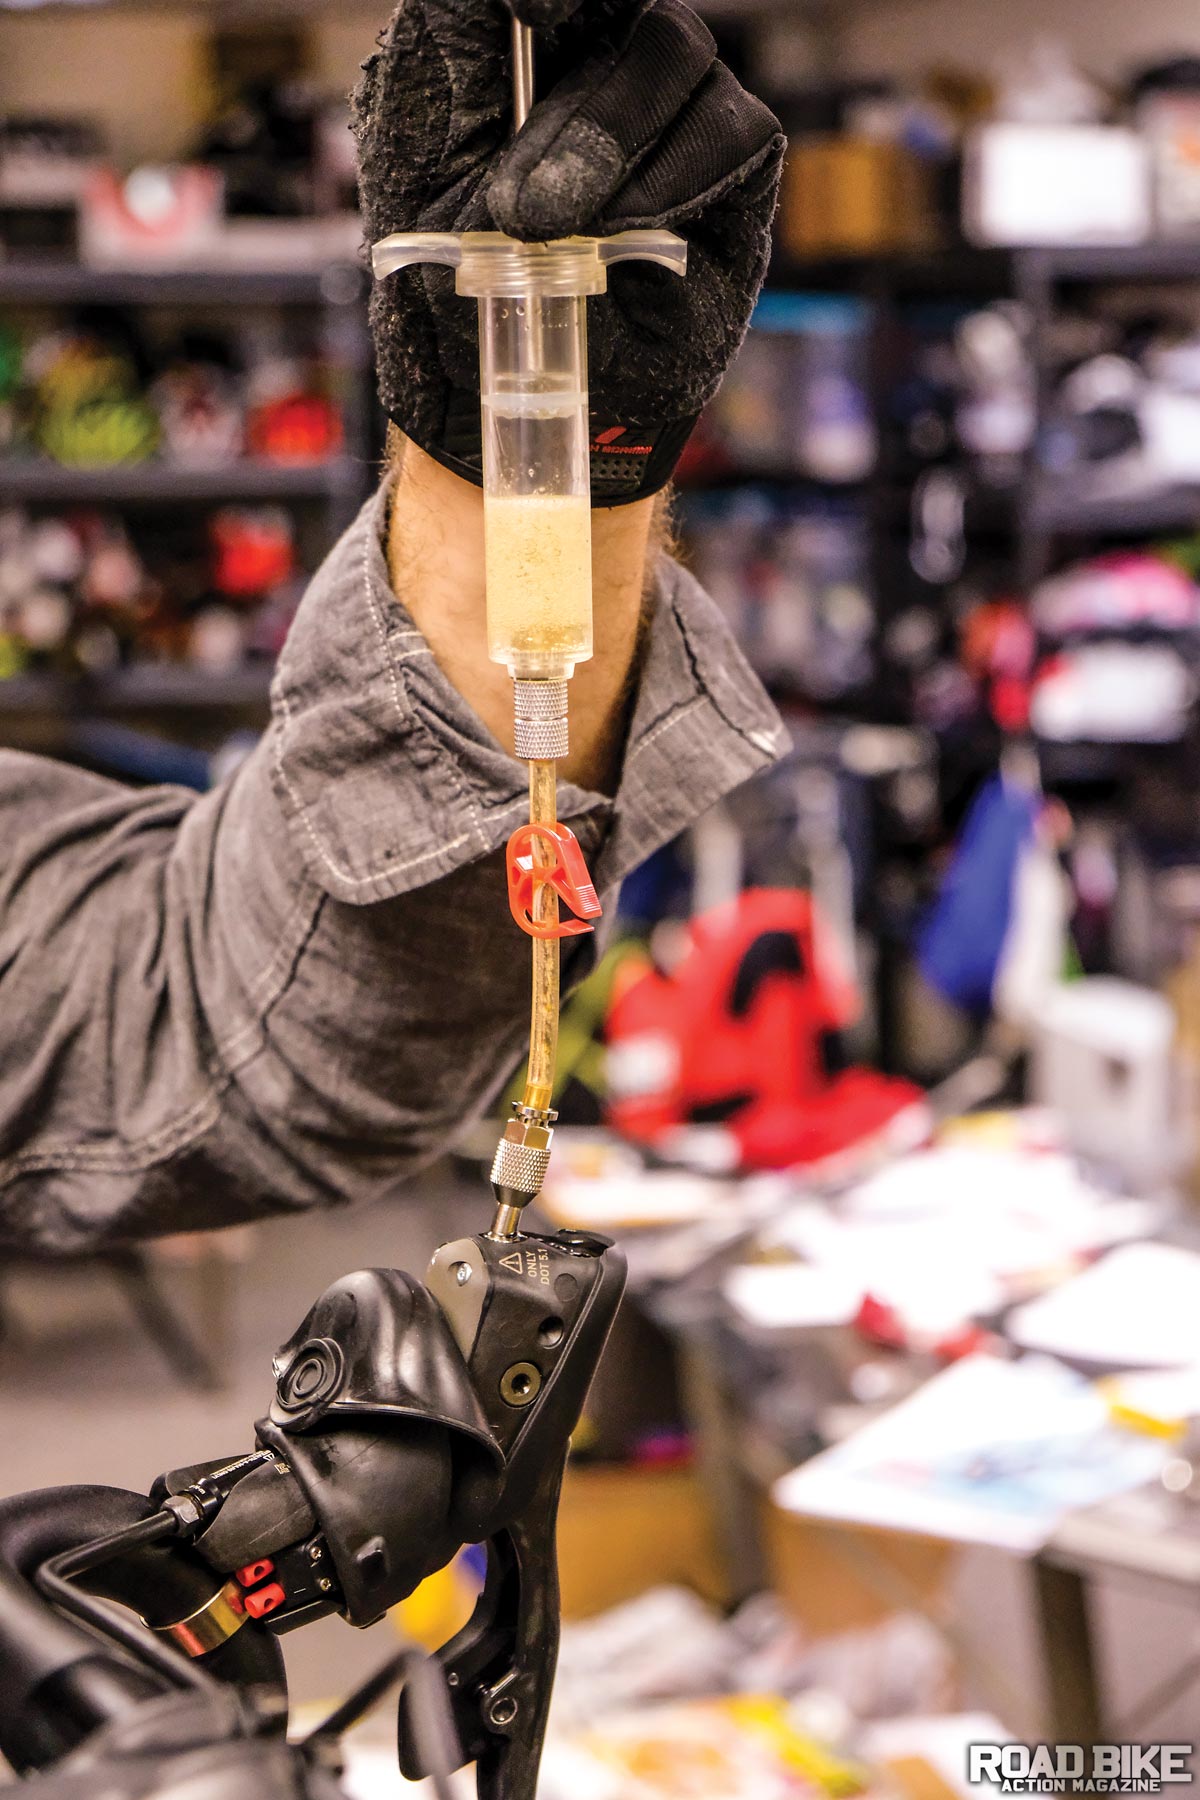
Brake fluids degrade differently over time and will require different schedules to maintain. DOT brake fluid, for example, is hydroscopic, which means it absorbs water over time and loses its resistance to heat expansion. DOT fluid brakes like SRAM should be bled as frequently as every year, or more if the brakes start to lose their snappy lever feel. Brakes that use mineral oil as fluid, like Shimano, Campagnolo, Magura and TRP, are less prone to fluid degradation, but should still be properly bled at least once a year. No matter which type of brake you have, a bleed will set the fluid to the proper level to accommodate for pad wear and simply make your brakes feel better. Remember to always bleed your brakes using a bleed block and not the pads, and definitely not worn pads. Not bleeding brakes correctly or not using a bleed block (normally supplied in a bleed kit) will result in too much fluid in the system, and the pistons will not be able to properly adjust as the pads wear.
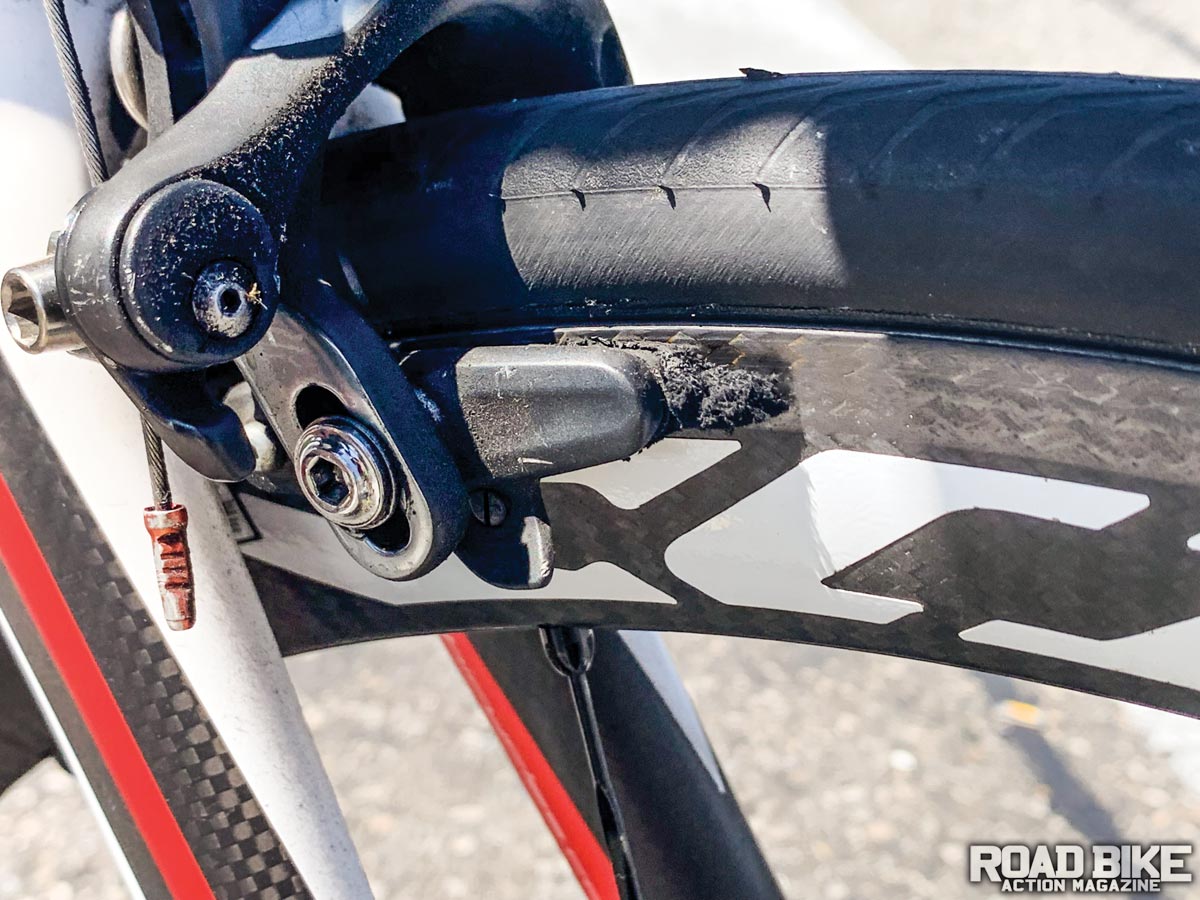
If you are still using rim brakes, then you, too, have wear to watch out for, but it will be on the pads and the braking surface of the rim. Rim brake pads seem to last forever, but they really don’t, and keeping them fresh will offer a much longer lifespan of the wheels. If you are using aluminum rims, never switch to carbon wheels without changing pads, too. First the carbon pad compound is normally softer, but the alloy wheels will leave small alloy fragments in the pads that will severely compromise a carbon wheel’s braking surface.
Since rim brake wheels are over-built to accommodate the heat, pressure and forces that rim brakes put on such a small area of the rim, they do tend to last a very long time. Signs that the braking surface is worn would be a pulsing feeling during braking or parts of the rim are discolored with excess pad material. This is normally because the braking surface is damaged and the pad wears unevenly in that area. At this point, rim brake technology has seen almost no technological advancements since 2012, so there is not as much concern with new trends. If you need to change rims and have rim brakes, be careful not to go too wide, because they will not all fit within the restrains of a rim brake caliper and could even cause a 25mm tire to rub on a fork leg or chainstay.
DRIVETRAIN
For most cyclists a new chain will last a couple of thousand miles, or about a season of riding. Obviously, this varies widely depending on conditions, rider weight and about a million other variables. New drivetrain components always work better than old ones, and if you’re fastidious with upkeep, they will always last longer. A new drivetrain may take a few rides to settle in, but your shifting should be relatively trouble-free for the first several hundred miles. Small noises and mis-shifts when components are relatively new are almost always adjustment related rather than wear related. If you’re having trouble getting new parts to work, be sure to go back and check less obvious adjustments, like the B-tension screw, cable housing length or even chain length if it was installed outside the factory. Also, consider what chain lube you’re using, as some factory-applied lubes may not be ideal for your riding conditions.

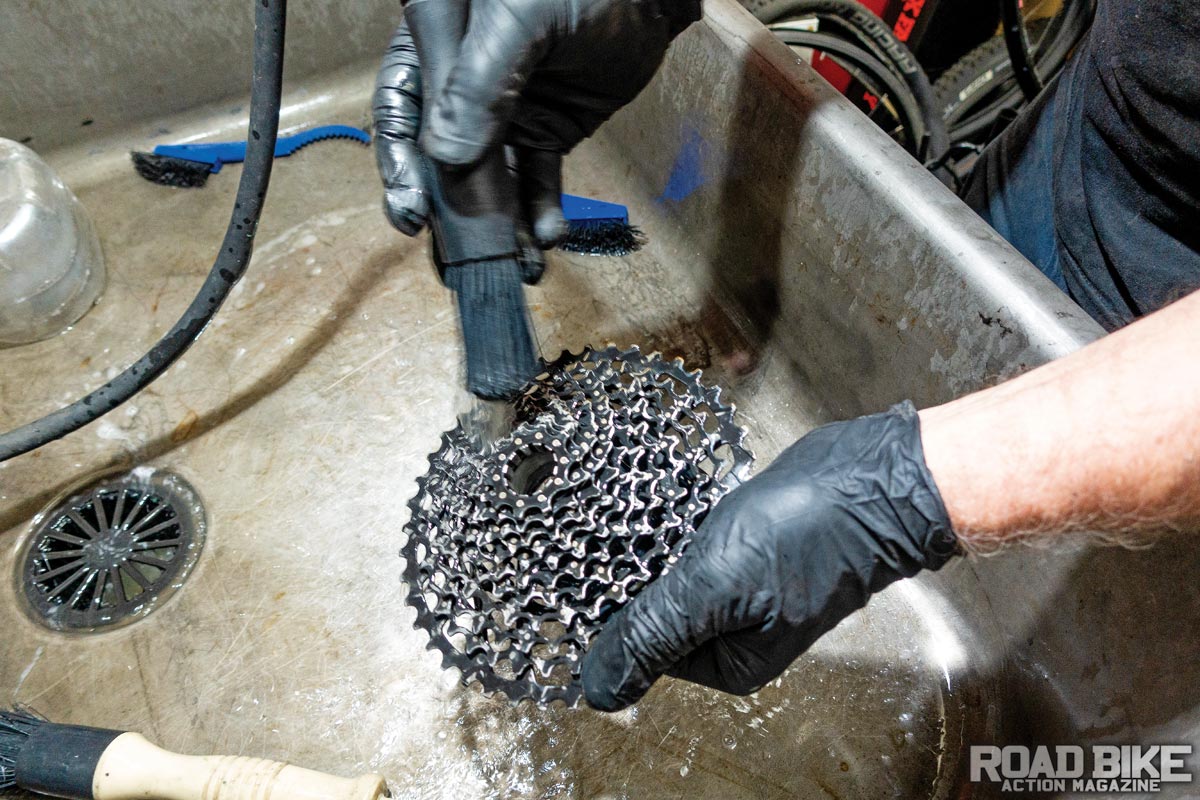
As a drivetrain begins to wear, it will slowly become noisier. Most chainrings and cassettes will work smoothly for about the lifespan of three chains as long as the chain is maintained well.
Using a worn chainring or cassette beyond that will likely cause noise and shifting issues. Not to say we haven’t seen it done with some success, but to quote ourselves, new parts work better than old ones here.
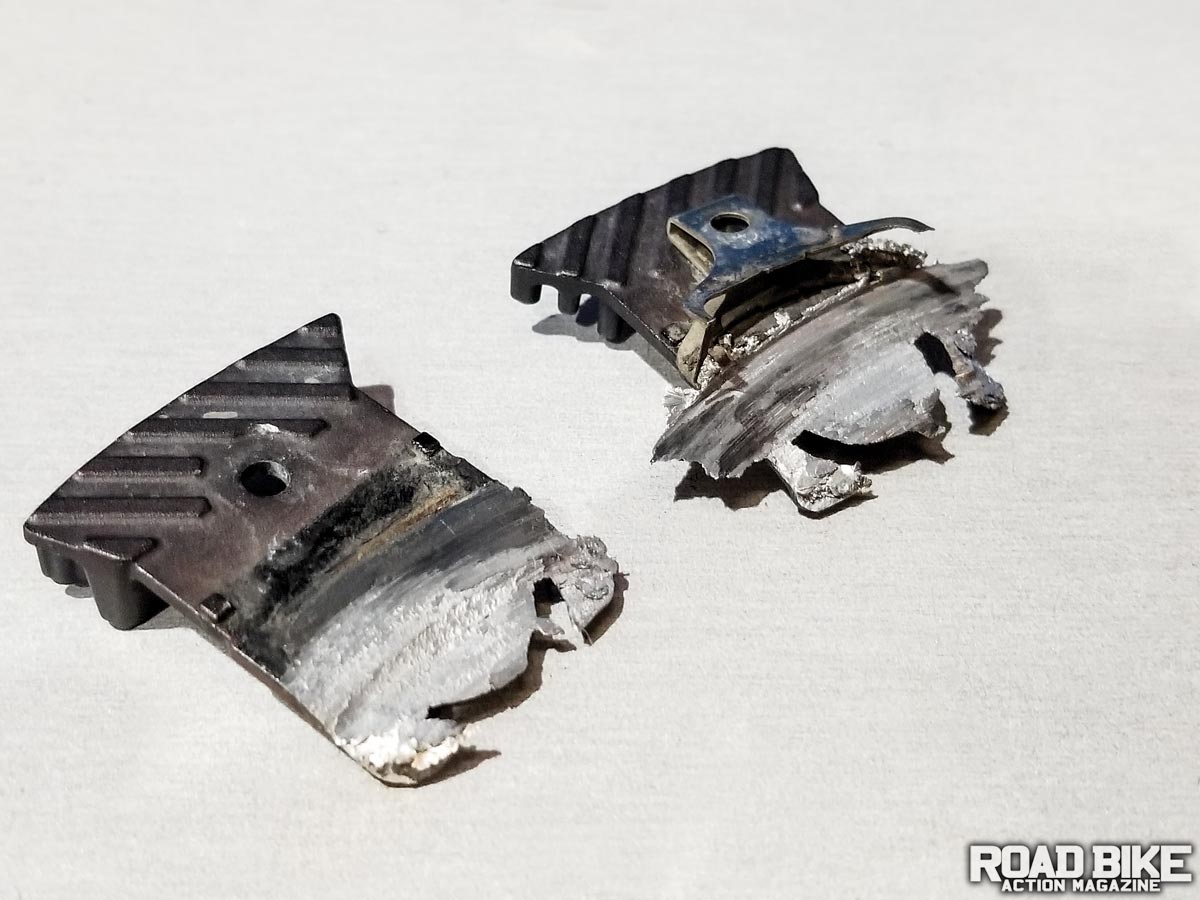
If you’re battling bent parts rather than worn ones here, we’ll go ahead and save you some time. Derailleur hangers can be bent back reliably once. Beyond that, they’re too brittle and will break and fail. Derailleurs and pulley cages can be bent back to improve really bad shifting, but they will never be perfect again. If you can live with fewer gear choices and a few of them that “click” through the pedal strokes, you can keep riding them while you save up the money to replace them.
THE CHAIN
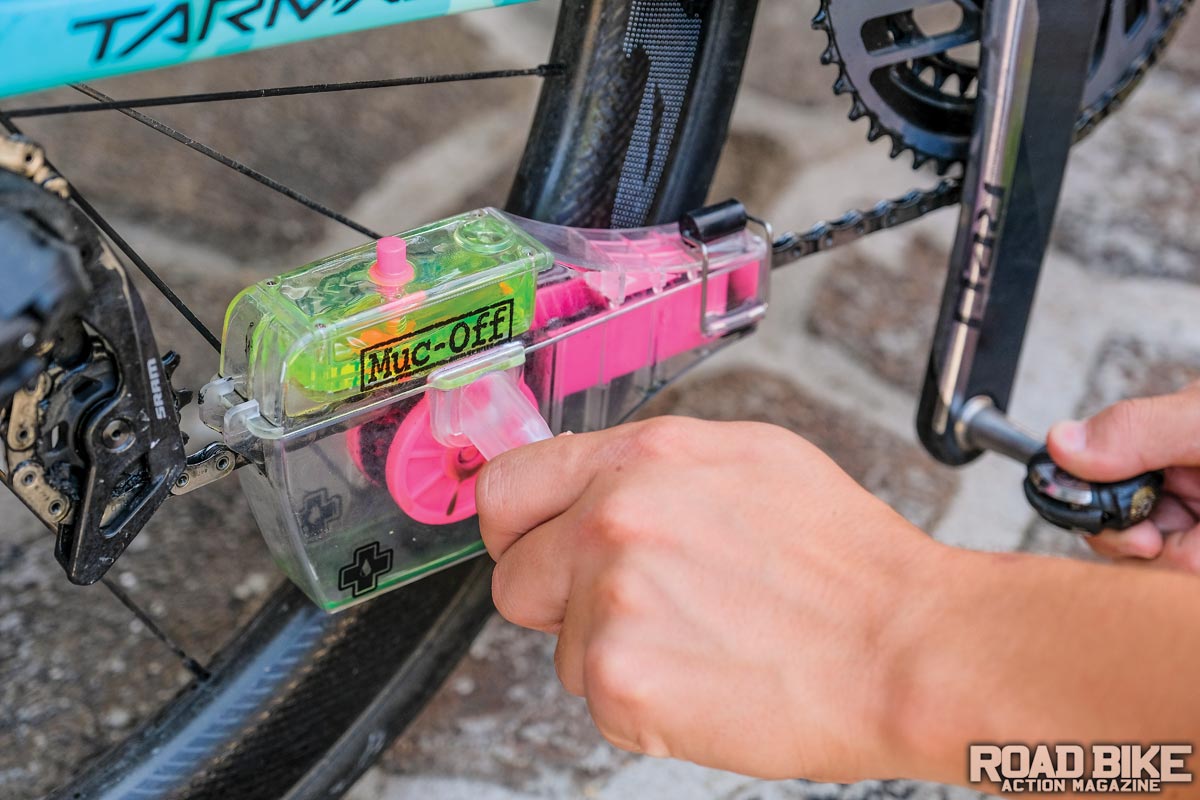
Part of the drivetrain, the chain is one of the most vital parts of the system. If not properly lubricated and maintained, it will prematurely wear everything it touches. So, regularly lubing your chain is very important, but doing it correctly tops the cake. Do not lube a chain before a ride or during, unless it is absolutely necessary.
The best time to lube your chain is after you have cleaned and dried your bike. This means it is being applied to the clean surface and should give it time to settle in and dry before it hits the open road. This minimizes the chance of it being wet and attracting dirt. You only need to lube the links of the chain, not everything in the drivetrain. In some cases, a wet lube is needed, but it is designed to shed mud and debris, normally in very wet conditions.
Cleaning a chain is easy if you haven’t been too liberal with the lube. Normally, the normal bike wash and a quick brush are all that is needed. If you use a wax lube or have been neglecting your maintenance,
removing the chain is the best way to give it a deep clean. Do not spray degreaser on your chain while it is on the bike. This can and will also get degreaser in the hub body and cause even more issues. Degreaser can also damage the paint, as well as some carbon layups.
One of the least expensive but useful tools is a chain checker. This specialty tool simply allows you to check how much wear your chain has and identify when it is getting close to the end of its life. Using this $10–$40 device regularly can save you hundreds of dollars and limit the chances of the dreaded snapped chain mid-ride.
ELECTRONIC SHIFTING
Electronic shifting has almost become the norm these days. There are also very few issues with modern systems making them a much more consistent experience for users. The batteries are probably the most common issue area, as they do need to be charged or replaced. If your system has wireless shifting, then it has a coin-cell battery that you need to replace every other year or so. The main battery or batteries for the derailleurs are rechargeable. They are said to get about 300 charge cycles, and for us, we normally charge them every other month. That means you are more likely to need a new bike before you need a new battery.
CABLES AND HOUSING
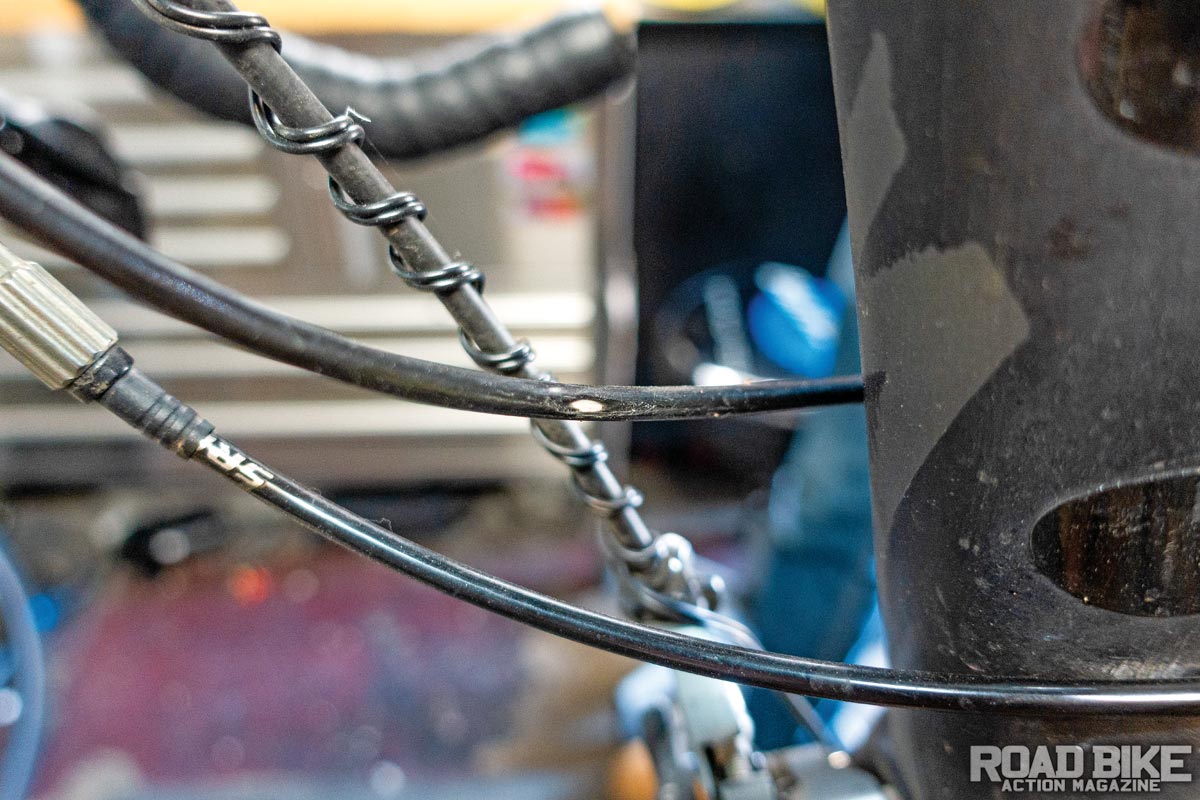
If your shifting has gone south and all the components in your drivetrain seem to be straight and true, try replacing the cable and housing (if you don’t have electronic shifting). It’s amazing how much a tiny bit of friction in the housing can wreak havoc on shifting, but this trick is a quick and cheap alternative to replacing a derailleur. With internal cable routing so tight these days, it’s worked for us more than once. Worn housing can be easily spotted by inspecting the black (usually) coating at the points it contacts the frame. Hot spots can develop at internal cable ports or guides and wear through. If this happens all the way down to the filaments inside, your cables will lose their ability to pull the derailleur, and you’ll likely be spending the rest of the ride on a single speed. Even if the outer housing has not worn through, a fresh inner cable can push out dirt and grit that’s infiltrated the housing and reduce friction, thereby improving shifting. It’s a quick and easy alternative to try before you start replacing the more expensive components.
FRAMES AND BEARINGS
The frame is the largest component of any bike. Bearings in the bottom bracket and headset will have a critical impact on your ride, so keeping them running smoothly is time well-spent. Don’t forget hub bearings. Sometimes they feel okay when spinning with no load, but with your weight and the loads that riding produces, they might not be so smooth.
Bottom bracket, wheel and headset bearings should all be inspected for play every single time you ride. Riding any of these components loose can cause damage to the surfaces they press into and make replacement more difficult or impossible. Thankfully, this is one of the quickest checks you can do, and they will become second nature in no time. To check hub bearings, move the wheels side to side and feel for play. If you feel something loose, check the hubs. If those are tight, keep checking other bearings and bolts until you find the culprit. A knocking in the front wheel could be tracked down to things like the hub, but could also be the headset or even a brake caliper that’s worked itself loose. Using your fingers to feel at points where there could be play is the best way to find the problem bearings to adjust or replace them.
Every cartridge bearing rolls smoothly when it’s brand new, but they all degrade over time. How fastidious you are with the bike will determine how long your frame’s bearings will last. Most companies estimate a frame bearing set will last two to five years, but this has everything to do with how the bike is cared for. Cleanliness is key here, but more important than making the bike shiny, try to prevent corrosion inside the bearings to extend their life. Washing a bike after a ride always feels like the best practice, but storing a bike before it’s dry will cause it to rust from the inside out. Keep your bike clean, but plan to spend as much time drying your bike as you did hosing it off for the best results. Remember that high-pressure water can penetrate a bearing seal and trap it inside, so don’t hit your bike with a direct stream of water.
Carbon frames especially do not typically wear out or fatigue, but like all parts they can fail. After washing your bike it’s a good time to give the frame an inspection to check for cracks or damage. Cracks can be obvious or as subtle as chipping paint. Most cracks tend to happen around seatstays and the head tube area. If it’s a metal bike, check around the edges of all welds, especially critical ones like at the bottom of the head tube/downtube junction.
PEDALS
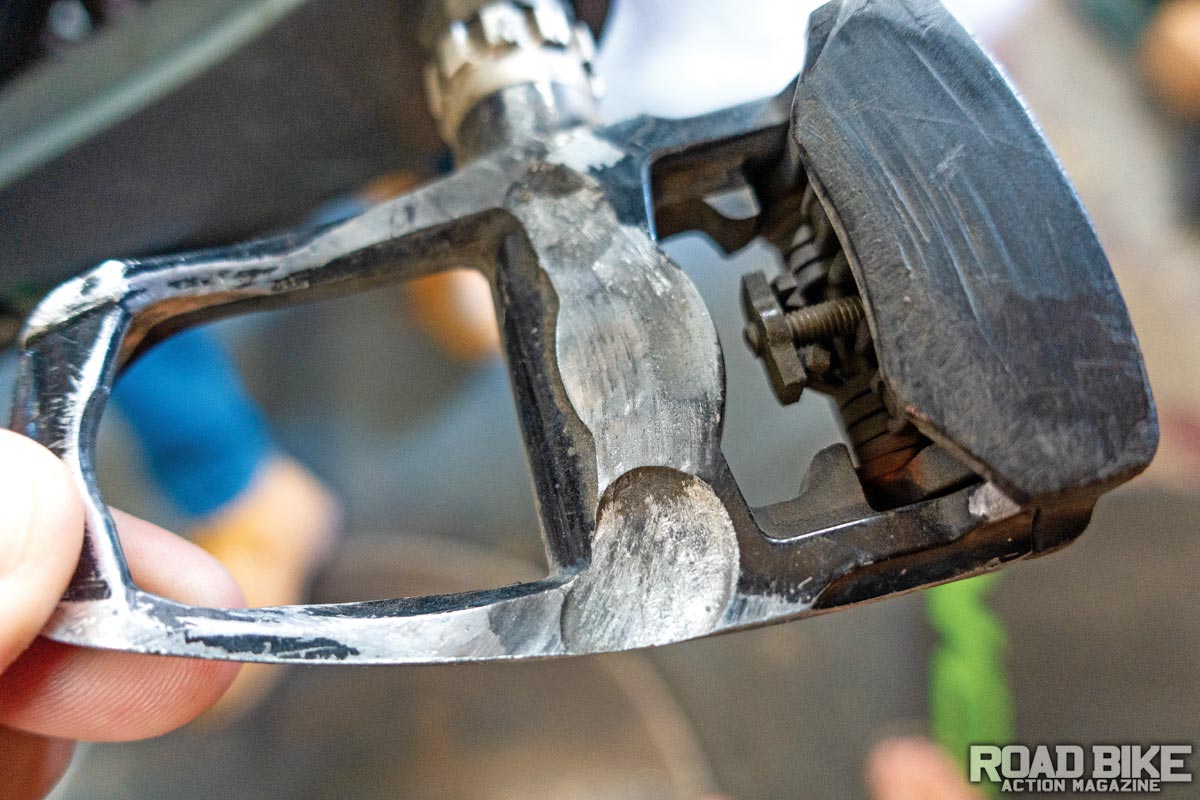
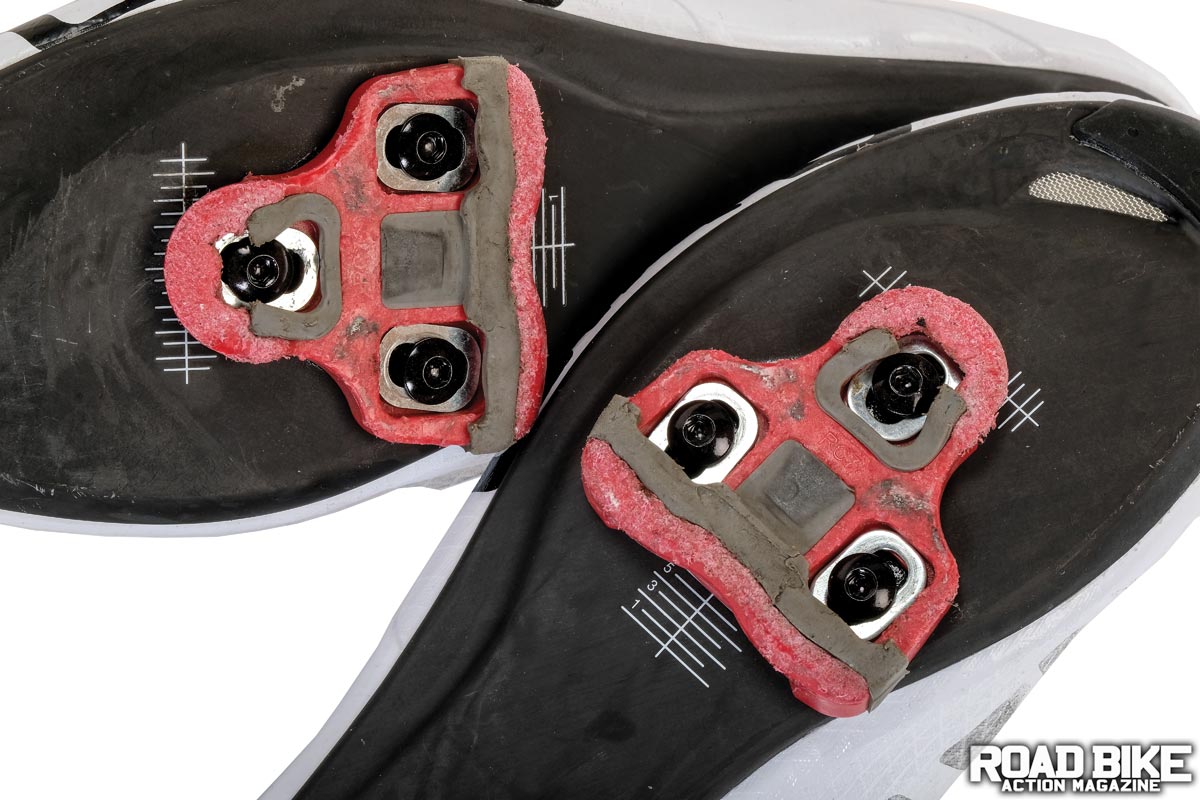
Generally speaking, your bike’s pedals are a low-maintenance item. Wear typically comes in the form of damage from crashing and is externally seen or felt in the form of a bent spindle. The most common wear item with clipless pedals aren’t the pedals but the cleats that clip into them. Walking and grime slowly wear the small contact points where the cleat interfaces with the binding mechanism on the pedal. The wear can be bad enough to cause performance loss so subtle that it seems they just fail out of nowhere. Signs of wear and need for replacement include difficult and inconsistent release or frequent unintended release. Pedal bearings can also fail over time, but if that is the case, just replace the whole pedal system, and the rest is likely very worn, too.

THE WORN-PARTS TIMELINE: THE FIRST YEAR
No matter how much you love or hate it, we all have to deal with maintaining our bikes. Some pay the fee at the local shop, while others are the DIY type. The most important thing to remember is that we are all in the same boat. If you feel like you never have to do anything to your bike, you are either not riding it as much or you’re simply neglecting it. The biggest thing to remember is that a well-maintained bike is a safe bike. Don’t be that person on the group ride that always has issues and everyone is afraid to ride behind because the bike makes funny noises and mysteriously shifts under load. The two most important things to remember are that: 1. There are also plenty of bike-specific tools that are best used to make the job easy and effective, and 2. If you’re at all unsure of how to work on your bike, at the very least watch some YouTube videos or rely on your local bike-
shop mechanic.
FIRST RIDES
—Even the top mechanics in the world will check their handiwork after a first ride or two to make sure bolts haven’t worked their way loose and bearings haven’t settled. The first few times out, pay particular attention to noises and vibrations you feel, as they may be a sign of mis-adjusted or loosened threads.
—Cable adjustments will be needed after a couple of rides to keep shifting crisp if you are using mechanical shifters or brakes. These are called “cable stretch” adjustments, because it would make sense that a braided cable would stretch out a little (or the housing compresses a little) and come out of adjustment. Don’t fret if your bike gets shifting issues after only a ride or two. These are easy to correct and shouldn’t come back.
—Feel for knocking bearings as you ride. If you notice the steering seems sloppy, or there’s noise coming from the front end, especially when braking, you may have loose headset bearings. Being able to spot issues like this and stop riding before you cause damage to expensive components is important when the bike is new and breaking in.
—Keep your bike clean, but don’t go overboard washing it with a hose. Our simplest cleaning kit includes some brushes, soapy water and a bucket. This should be all you need to keep the bulk of dust and dirt out of the drivetrain and other problem areas. Be sure not to pressure-wash anything that could force water into places it shouldn’t be, like bearings or components. And, never put your bike away wet.
—New bikes come with a lubricated chain. You won’t need to refresh this for at least a ride or two, but the factory lube might not be ideal for your riding conditions. Consult your local shop for their suggestions.
ONE MONTH
—Real brake and shifting adjustments will need to happen after some ride time. Expect in the first few weeks to have to fine-tune some if not most of these components.
—If you are using tubeless tires and sealant, the liquid will evaporate in the first 6–10 weeks, even if you never got a flat tire. You will need to replenish the sealant supply in the tires to keep them working properly; otherwise, you risk a true flat with even the smallest thorn or glass puncture in the tire.
—Inspect brake pads, especially if you do a lot of descending or are a heavier rider. These components are designed to wear out, and the amount of time it takes to wear them down varies tremendously depending on your riding style and conditions. If only your rear brake pads show wear, you need to work on technique, as the front brakes should do the majority of your stopping.
—Every bike develops creaks. It doesn’t matter what your bike says on the downtube or the price tag, every bike will turn from a precisely tuned machine to a creaky pile of you know what. Don’t believe us? Just do a Google search on “creaky new bike” and see what comes up. Riders who purchase at a local shop have a major advantage here. Most of the time, the local bike mechanic has diagnosed not only your creak but several others on the same component or even bike model. There is value in that expertise, and you will have to acquire or pay for it when you decide to buy direct. Learn to speak your bike’s language, and narrow down where creaks, cracks and other vibrations are coming from.
SIX MONTHS
—Inspect bearings and bolts for unusual wear. This may require special tools, as things like bottom brackets require cup tools.
—Know how to spot a warranty issue, and do it before a year is up. The window between when you buy the bike and the day the warranty expires is valuable. If there’s something giving you issues, don’t put off contacting the company for long.
—Check the chain/chainrings for wear. Most riders will get about a season out of a chain and a couple seasons out of the rest of their drivetrain. Replacing the chain before it wears out will prevent the rest of the parts from wearing prematurely. Six months is a good time to check for most riders.
—Inspect cables and housing for wear. Worn housing (outer liner) will look rubbed thin, kinked or frayed inside the ferrules. Worn shifter cables (inner cable) are kinked or frayed. Any of these symptoms and you should replace them.
—Bleed the brakes if either the front or rear feels off. Hydraulic brakes that use DOT fluid can degrade rather quickly and will work better if they’re bled a couple of times a year. Brakes that use mineral oil can go without bleeding, although the fluid levels will change as the pads wear down. It’s best to just count on preventatively bleeding a couple of times a season.
—Replace the brake pads if worn below the thickness of the return spring or anywhere near the backing plate
—If you’re running tubeless, if you haven’t added any new sealant by now, you need to.
ONE YEAR
—Replace the chain if you’re anywhere near a full season of use. The longevity benefits to the rest of your drivetrain are worth it. Also, consider a chain-checking device to make sure you never ride a worn chain.
—Replace worn housing, even if your shifting still feels pretty good. You’ll be surprised how good a new cable feels.
—Replace brake pads/inspect rotors, especially if you’ve changed the pads. Most rotors should be able to handle four to six sets of pads, depending on the compound you’re using. But, if your brakes feel worse for wear no matter how much you adjust or bleed them, fresh pads with fresh rotors will make them feel good as new.
—Inspect tires for wear and small cuts. If you have a flat spot or the tire has any deformation, replace it immediately. If you are tubeless, pull the tire off and check for embedded debris that the sealant may have sealed around without you knowing. Also, start with some fresh sealant or maybe a new tube.
Comments are closed.